How to Create an Apple Developer Account (Complete Beginner's Guide)
So you've built your app. Or maybe you're about to build your app. Either way, you've run into the same wall that every iOS developer hits sooner or later: you need an Apple Developer account before your app can see the light of the App Store.
The good news? It's not as complicated as it looks. This guide walks you through the whole thing — from "what even is this?" to a fully active account — in plain English. No jargon, no fluff.
What Is the Apple Developer Program?
Think of the Apple Developer Program as your VIP backstage pass to Apple's ecosystem. Without it, you can tinker on your own device, but your app goes nowhere. With it, you can publish to the App Store, run beta tests, and tap into Apple's most powerful features.
It costs $99 per year. That one membership covers all Apple platforms — iOS, macOS, watchOS, tvOS, and even visionOS. You're not paying separately for each one.
Wondering about hidden fees? See our complete breakdown of How Much Does It Cost to Publish an App on the App Store in 2026?
What You Actually Get
- App Store distribution — publish apps for iPhone, iPad, Mac, Apple Watch, and Apple TV
- TestFlight — send beta builds to up to 10,000 external testers before you launch
- Advanced Apple features — Push Notifications, Apple Pay, iCloud, Sign in with Apple, HealthKit, App Clips, and more
- Beta OS access — test your app on the next iOS version before it's public
- WWDC resources — Apple's annual developer conference content, sessions, and sample code
Free Apple ID vs. Paid Membership
| Capability | Free Apple ID | Paid Membership ($99/yr) |
|---|---|---|
| Build apps in Xcode | ✅ | ✅ |
| Sideload to your own device | ✅ (7-day certificate) | ✅ |
| Publish to the App Store | ❌ | ✅ |
| TestFlight beta testing | ❌ | ✅ |
| Push Notifications, Apple Pay | ❌ | ✅ |
Bottom line: if you want to actually ship something, you need the paid membership.
Other Program Types (Just So You Know)
- Apple Developer Enterprise Program — $299/year, for large companies distributing apps internally (not through the App Store). Not relevant for most people.
- Apple Consultants Network — for certified Apple consultants. Also not what you're looking for here.
This guide covers the standard Apple Developer Program — the $99/year one.
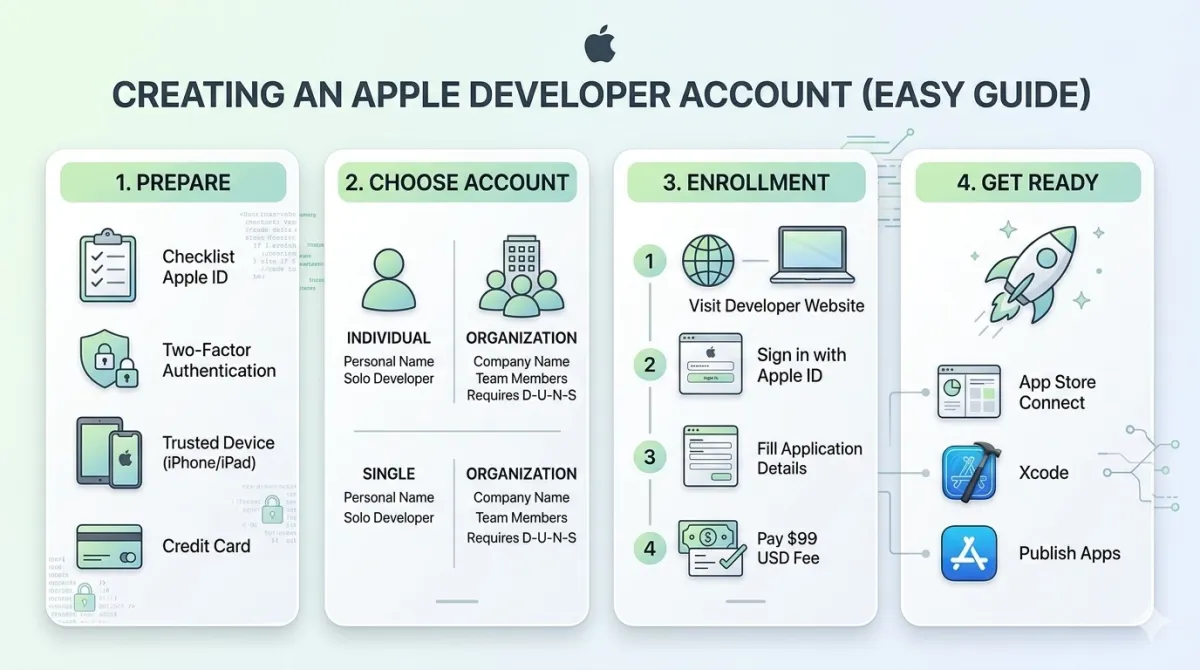
Before You Start: Get These Things Ready
Think of this as your preflight checklist. Grabbing everything before you open the enrollment page will save you a lot of frustration.
For Everyone
- ✅ An Apple ID — if you don't have one, create it at appleid.apple.com
- ✅ Two-factor authentication (2FA) enabled on that Apple ID — this is mandatory, not optional. Apple won't let you in without it.
- ✅ A trusted device (iPhone, iPad, or Mac) to receive 2FA codes
- ✅ A credit or debit card for the $99 fee
- ✅ About 15–30 minutes of uninterrupted time (for individuals)
If You're Enrolling as an Individual
- ✅ Your legal name — exactly as it appears on your government-issued ID. Not a nickname, not an abbreviation.
- ✅ A passport or driver's license nearby — Apple may ask for identity verification
If You're Enrolling as an Organization
- ✅ Your D-U-N-S number — a free 9-digit business identifier. Look yours up or request one at Dun & Bradstreet's federal registry
- ✅ Your legal entity name — exactly as it appears in public business records (LLC, Inc., Ltd., etc.)
- ✅ A legal signatory — the person who can legally sign contracts for your company must be the one enrolling. Not an employee, not a contractor.
- ✅ A live, public business website and a working phone number
- ✅ 1–5 business days buffer time — D-U-N-S verification takes a while
💡 Quick tip for businesses: Use a dedicated email address for your Apple ID — something like dev@yourcompany.com. It keeps your developer account completely separate from your personal iCloud and looks more professional to Apple.
Individual vs. Organization: Which One Do You Need?
This is genuinely the most important decision in the whole process. Get it wrong and your personal name ends up plastered on every app you publish — which is fine for personal projects, but maybe not ideal for your professional product.
Individual Account
- Your personal legal name shows in the App Store (e.g., "Sara Khan")
- No D-U-N-S number needed
- You can't add team members
- Best for: solo developers, hobby projects, freelancers testing the waters
Organization Account
- Your company or brand name shows in the App Store (e.g., "Acme Studio LLC")
- Requires a D-U-N-S number and a legal signatory
- Supports multiple team members with different permission levels
- Best for: registered businesses, teams, anything client-facing
Side-by-Side Comparison
| Feature | Individual | Organization |
|---|---|---|
| App Store name displayed | Your legal name | Your company name |
| Team members | ❌ | ✅ |
| D-U-N-S required | No | Yes |
| Annual fee | $99 | $99 |
| Who must enroll | You | Legal signatory only |
| Typical approval time | Minutes – 48 hours | 2–7 business days |
Three Quick Questions to Help You Decide
- Do you have a registered legal business entity (LLC, Inc., Ltd.)? → Organization
- Will other people — designers, developers, QA — need access to your App Store account? → Organization
- Is this a personal or portfolio project and you're working alone? → Individual
⚠️ Can you switch later? Technically yes, but it involves contacting Apple support and manually reassigning your apps. It's a hassle. Pick the right path now and save yourself the headache.
Step-by-Step: Enrolling as an Individual
The whole thing takes about 15–20 minutes. Here's exactly what happens.
Step 1 — Head to the Enrollment Page
Go to developer.apple.com/programs/enroll and click "Start Your Enrollment". Sign in with your Apple ID when prompted.
Step 2 — Select Your Entity Type
Choose "Individual / Sole Proprietor / Single Person Business". Your legal name should already be pre-filled from your Apple ID — double-check that it matches your government ID exactly. Even a small difference (like "Mike" vs. "Michael") can cause delays.
Step 3 — Review and Accept the License Agreement
Apple's license agreement is long. You don't have to memorize it, but do give it a read. Check the box to confirm and click "Continue".
Step 4 — Pay the $99 Fee
You'll land on Apple's payment page. The fee is $99 USD (or the equivalent in your local currency — it varies by region). Most major credit and debit cards are accepted. Save your receipt — it's helpful for renewal tracking.
Step 5 — Wait for Confirmation
A confirmation email usually arrives within a few minutes. Full account activation can take up to 24–48 hours — this is completely normal. Don't panic if your account isn't instant. You'll get a second email with a link to App Store Connect once everything's active.
After Enrollment
- Log into appstoreconnect.apple.com — this is your main dashboard for everything going forward
- Open Xcode → Settings → Accounts and add your Apple ID to sync your certificates automatically
Step-by-Step: Enrolling as an Organization
Organization enrollment has one extra step that trips people up almost every single time: the D-U-N-S number. Here's how to handle it.
Step 0 — Sort Out Your D-U-N-S Number First
Before you even open the enrollment page, do this:
- Go to Dun & Bradstreet's lookup tool and search for your business
- Found it? Note the number and make sure the legal entity name in their database matches your business registration exactly
- Not found? Request a new D-U-N-S number — it's free, but takes up to 5 business days
This single step is the #1 cause of delays. A name mismatch between what you submit and what's in D&B's database will fail Apple's verification. Fix it before you start.
Step 1 — Sign In as the Legal Signatory
The person who signs contracts on behalf of the organization must be the one enrolling. Using someone else's Apple ID is a common rejection reason.
Step 2 — Select "Company / Organization"
On the enrollment page, choose "Company / Organization". Enter your legal entity name exactly as it's registered — no abbreviations unless that's how it's officially filed.
Step 3 — Enter Your D-U-N-S Number
Apple verifies your D-U-N-S number against D&B's records in real time. If there's any mismatch, verification fails. Allow 24–48 hours for confirmation after submission.
Step 4 — Add Organization Details
- Your business website URL (must be live and publicly accessible — not a coming soon page)
- A primary phone number
Step 5 — Pay and Submit
Complete the $99 payment. One heads-up: Apple may actually call your provided phone number to verify. Answer it! Missing that call can delay your enrollment by days.
Step 6 — Set Up Your Team After Approval
Once you're in:
- Go to App Store Connect → Users and Access
- Invite team members and assign roles:
| Role | What They Can Do |
|---|---|
| Admin | Everything — manage apps, team, billing |
| App Manager | Manage app metadata and submissions |
| Developer | Upload builds via Xcode or Instruments |
| Marketing | View sales and trends data |
| Customer Support | Respond to user reviews |
💡 Never share your Admin credentials. Every team member gets their own Apple ID and their own invite. The minimum necessary role is always the right call.
After Enrollment: Setting Up Your Developer Environment
Your account is active. Now what? Here's what to do in the first hour.
Get Comfortable With App Store Connect
App Store Connect is your home base. You'll use it to submit apps, run TestFlight betas, view sales data, respond to reviews, and manage your team. Bookmark it.
Install or Update Xcode
Xcode is Apple's free development environment — it's where you actually build apps.
- Download it from the Mac App Store (search "Xcode") or directly from developer.apple.com/xcode
- Check the minimum macOS version requirement before updating — Xcode updates sometimes require an OS upgrade too
- Budget 30–60 minutes for the download and install. It's a big file.
Connect Xcode to Your Apple ID
- Open Xcode → Settings → Accounts
- Click the
+button and sign in with your Apple ID - Xcode will automatically download and manage your signing certificates and provisioning profiles
- For beginners: leave "Automatically manage signing" turned on. It handles the fiddly stuff so you don't have to.
Create Your First App ID (Bundle ID)
Your Bundle ID is a unique identifier for your app. It follows the format: com.yourcompany.appname
A few important things to know:
- It must be globally unique across the entire App Store
- Once your app is published, it cannot be changed — ever
- Choose it carefully.
com.yourname.myappis fine for a personal project;com.acmestudio.projectnamelooks more professional for a business app
Enabling Special Capabilities
Some features need a bit of extra setup beyond just toggling them in Xcode:
- Push Notifications — create an APNs key in the developer portal
- iCloud — set up a CloudKit container
- Sign in with Apple — add it to your App ID in the portal first
- Apple Pay — requires a Merchant ID and a payment processing agreement
Common Mistakes (And How to Avoid Every One)
These aren't hypothetical. These are real problems that delay real developers every week.
Using Your Personal Apple ID for Development
What goes wrong: 2FA codes arrive on your family's shared iPad. Your iCloud photos and your app certificates live in the same account. It gets messy fast.
The fix: Create a separate Apple ID dedicated to development.
Enrolling as an Individual When You Should Be an Organization
What goes wrong: Your personal name shows up on your app's App Store listing. Awkward for a client project. Very awkward for a business product.
The fix: If there's even a chance your app will represent a brand, enroll as an organization from the start.
D-U-N-S Mismatch With Your Legal Entity Name
What goes wrong: Apple's verification fails silently. You wait several days and then receive a rejection asking you to resubmit.
The fix: Search your D-U-N-S record before starting enrollment and confirm the name matches your business registration exactly.
Letting Your Membership Lapse
What goes wrong: Your apps get removed from the App Store for new downloads the day your membership expires. Existing users keep their installs but can't update, and you stop acquiring new users.
The fix: Set a calendar reminder 60 days before renewal. That's enough time to handle a changed credit card or a team handoff. Also enable auto-renew in your Apple ID settings.
Giving Team Members the Wrong Role
What goes wrong: A contractor with Admin access accidentally deletes an app, changes banking details, or invites someone they shouldn't.
The fix: Always assign the minimum role someone actually needs to do their job.
Reusing a Bundle ID Across Multiple Apps
What goes wrong: Certificate conflicts, provisioning errors, and potentially an App Store rejection.
The fix: One unique Bundle ID per app. No exceptions. Follow com.company.appname every time.
Expert Tips for Long-Term Success
These habits separate developers who run smooth operations from those who spend an afternoon fighting certificate errors.
- Use a dedicated Apple ID for development — separate from your personal iCloud, tied to a professional email address
- Set your renewal reminder 60 days out, not 30 — gives you time to handle expired cards, team changes, or billing surprises
- Manage team access with roles, not shared passwords — every person gets their own invite; Admin credentials stay with you
- Let Xcode handle signing automatically — unless you're running a CI/CD pipeline with Fastlane or GitHub Actions, Xcode's automatic signing is reliable and saves hours
- Use TestFlight before every App Store submission — it's included in your membership and catches real-world bugs that internal testing misses. It also meaningfully reduces App Store rejection rates.
- Enable 2FA on a stable, dedicated device — not a phone you're planning to trade in next month. Losing 2FA access to your developer Apple ID is one of the hardest problems to recover from.
- Save your Apple ID recovery key offline — write it down and put it somewhere safe. It's your emergency exit if you ever get locked out.
- Bookmark developer.apple.com/news — Apple posts required SDK updates, certificate expiry notices, and policy changes here. Missing a mandatory update can get your app removed from the App Store without warning.
Frequently Asked Questions
Do I need a Mac to create an Apple Developer account?
No — enrollment is done in a web browser and works on any device. But you will need a Mac with Xcode to actually build, test, and submit apps.
Is the $99 refundable if my enrollment is rejected?
Generally, no. That said, outright rejections are rare. Most issues are fixable — a name mismatch, a D-U-N-S problem, a 2FA hiccup. Apple usually asks you to correct and resubmit rather than just rejecting outright.
Can I have more than one Apple Developer account?
Individuals are limited to one account per person under the program agreement. Organizations can have separate accounts (for different subsidiaries, for example) but can't use multiple accounts to get around App Store Review guidelines.
How long does enrollment actually take?
- Individual: typically minutes to 48 hours after payment
- Organization: 2–7 business days, depending on D-U-N-S verification and whether Apple needs to call your organization
Does one $99 membership cover all Apple platforms?
Yes. iOS, iPadOS, macOS, watchOS, tvOS, and visionOS — all platforms, one fee.
What happens to my published apps if I don't renew?
Your apps are removed from the App Store for new downloads once your membership lapses. Users who already installed the app can keep it, but they won't receive any updates. Renewing restores full availability.
Do I need a developer account just to test on my own iPhone?
No. With a free Apple ID, you can sideload directly to your device via Xcode. The catch: the certificate expires every 7 days and you have to reinstall manually. For anything beyond solo tinkering — especially TestFlight or App Store distribution — you'll need the paid membership.
You're Ready — Here's What to Do Next
Here's a quick recap of everything covered:
| Decision | What to remember |
|---|---|
| Individual vs. organization | Choose organization if you have a legal entity or need team access |
| D-U-N-S number | Verify your name in D&B before submitting — mismatches cause delays |
| Bundle ID | Set it carefully — it cannot be changed after your app is published |
| Annual renewal | Set a 60-day reminder; lapsing removes your apps from the App Store |
| Team access | Use role-based access; never share Admin credentials |
Your Next Steps
- ✅ Enroll at developer.apple.com/programs/enroll
- ✅ Set up App Store Connect and connect your Apple ID to Xcode
- ✅ Create your first App ID (Bundle ID) in the developer portal
- ✅ Build your first beta and distribute it via TestFlight
- ✅ Submit your first app to the App Store
The hardest part of publishing an app isn't the code — it's navigating the paperwork for the first time. You've done that now. Everything from here is the fun part.
*Last updated: May 2026 · Based on Apple Developer Program enrollment flow as of iOS 18 / Xcode 16*